Approving or rejecting expenses
By monitoring expenses, hiring managers can identify spending trends and allocate resources more effectively, to ensure compliance with company policies and reduce the risk of overspending.
To ensure accurate allocation of costs, these expense types are available in Professional:
- General expenses
-
They cover any business-related costs that are not directly tied to workers or employees but are necessary for operations, such as project-related fees or office supplies. Only suppliers can submit general expenses in the Supplier Network app.
- Worker expenses
-
They cover any costs related to employee or worker compensation, such as background checks, supplier fees, or reimbursable expenses. Workers can submit them in the Talent Experience app and, sometimes, suppliers can submit them on behalf of workers in the Supplier Network app.
The system assigns a Pending status to all submitted expenses.
To promote accurate record-keeping practices, submitted expenses can’t be deleted.
Hiring managers and program office users can find all pending, approved, rejected, and invoiced expense records in the Time & Expenses hub in Beeline Professional. Additionally, all expenses pending approvals are included in the Tasks area of Professional. Typically, hiring managers and program office users can approve or reject expenses.
Expenses can be rejected and resubmitted multiple times. However, expenses can’t be rejected after the approval has been finalized. Instead, approved expenses must be corrected to ensure that any changes are amended in a way that maintains data integrity and record accuracy. Workers and suppliers can correct expenses in the Talent Experience and Supplier Network apps respectively. Program office users can correct expenses using the Import Data tool in Professional. For more information, see About corrections and Correcting expense records.
Before you begin
-
Expenses must be submitted through the Supplier Network or the Talent Experience apps before you can view them in Professional.
Approving or rejecting expenses in the Tasks area
To approve or reject expenses, complete these steps from any supported browser.
-
Log in to Professional.
-
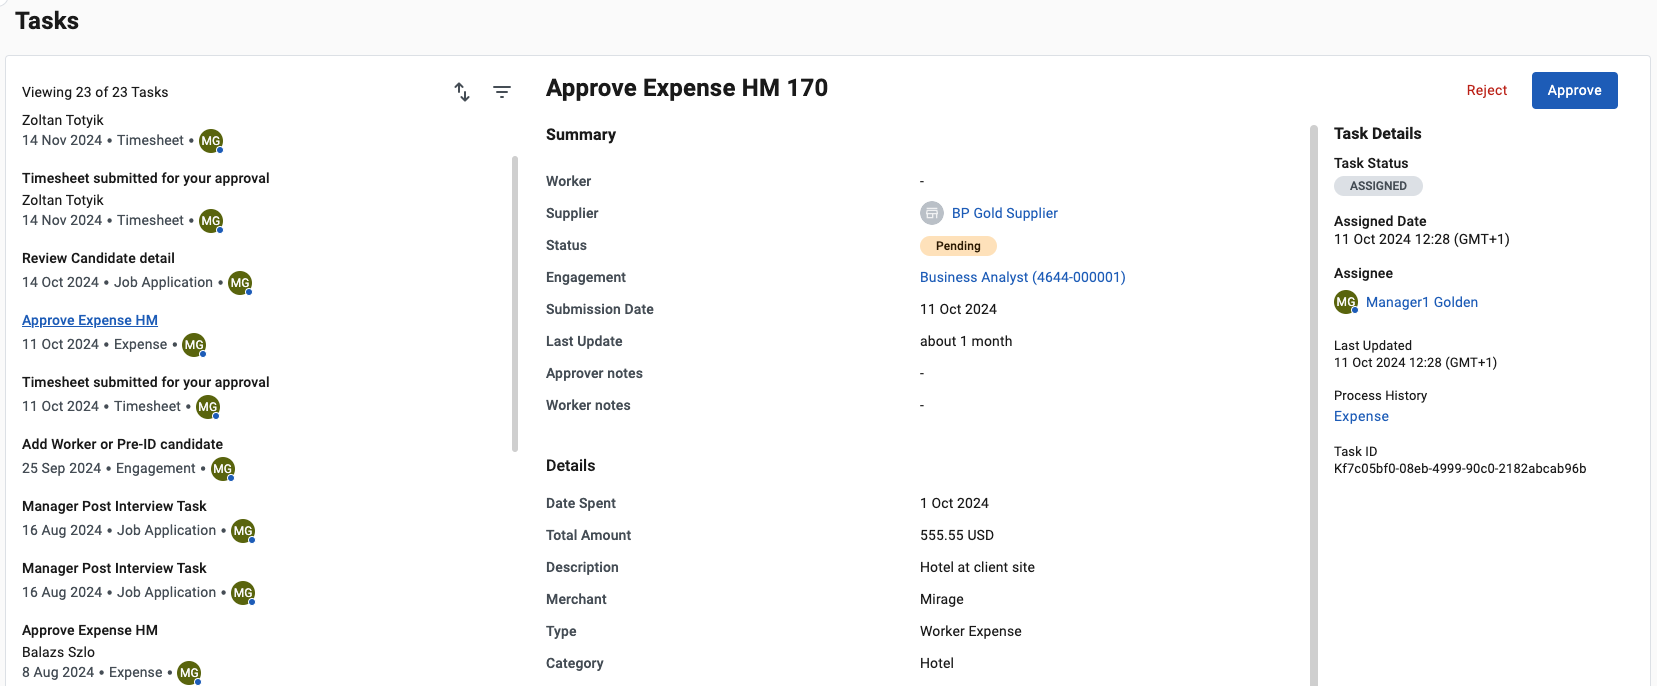
Select Tasks from the left navigation. The Tasks page displays.
-
Review your task list on the left and select a task associated with expense approvals. Depending on how your site is set up, your tasks might be named differently.
 Figure 1. Approving expenses in the Tasks area
 -
Review the details of the submitted expense record.
-
From the upper right, select Approve to authorize an expense or Reject to disallow an expense.
When you reject an expense, you can add a note to the worker to request clarifications or adjustments.
-
Repeat this action for all the expenses in the Tasks list.
After you approve or reject an expense, its status is updated to Approved or Rejected and the changes are reflected in the Supplier Network and Talent Experience apps.
Approving or rejecting expenses in the Time & Expenses hub
To approve or reject multiple expenses in one action, complete these steps from any supported browser.
-
Log in to Professional.
-
Select Time & Expenses from the left navigation and then, select the Expenses tab. The Expenses page displays.
-
Optional: Adjust your filters to narrow down a selection of expenses by completing these steps:
-
Select All Filters from above the expenses table.
 Figure 2. Expenses filters
The Filters side panel displays.
-
Activate the Pending status and deactivate any other statuses.
-
Use any other filters that may help you narrow your list further.
-
Close the Filters panel.
-
-
Optional: To review the details of an expense record, select the expense ID from the table. The expense Summary side panel displays.
-
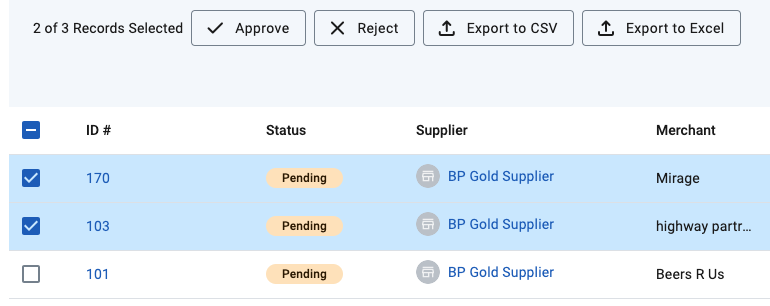
Select the expense records you want to process and next, select Approve to authorize the expenses or Reject to disallow them.
 Figure 3. Selecting multiple expenses
After you approve or reject the expenses, their status is updated to Approved or Rejected and the changes are reflected in the Supplier Network and Talent Experience apps.