Configuring MSP users
| This article applies only to technology preview features. To request the new Import Data tool available as a technology preview feature, contact your Client Services representative. |
The managed services provider (MSP) helps a company manage various human capital functions such as overseeing the contingent talent life cycle from requisition through invoicing and payment.
As a Beeline Professional administrator, you can create a template and use the Import Data tool to set up MSP users in a tenant.
For smaller scale scenarios with only a few users to add, you can add MSP users manually.
Before you begin
-
You must have administrator access to the tenant site you’re setting up.
-
Identify which users must manage MSP-related tasks in Beeline Professional.
Steps
Configuring MSP users manually
To configure MSP users manually, complete these steps from any supported browser.
-
Log in to the Professional site you’re setting up.
-
From the left navigation, go to and select the Users tab.
-
For each MSP user that you want to configure, complete these steps:
-
Select Create User and enter these details:
-
First Name
-
Last Name
-
Email
-
Reference ID
-
-
In the User Type section, select General User.
-
Select Create User.
-
-
Optional: Repeat these steps for each MSP user you want to configure.
Configuring MSP users using a template
To import multiple MSP users, complete these steps from any supported browser.
-
Log in to the Professional site you’re setting up.
-
From the left navigation, go to Home and select Import Data.
-
Create a template that you can use with the Import Data tool:
-
From the Data object field, select User.
-
To download a template, select Templates from the Import Templates section, and then select the default user template from the Select a template list. Select Download.
-
Open the template file in Microsoft Excel ©. These columns are required for the template:
-
First Name -
Last Name -
Email -
User Type. EnterTENANT_USERas the user type.
-
-
To populate the template, add each user as a separate entry, for example, one row for each user that you want to add.
-
Save the populated template with a different file name.
-
-
Go to the Import Data dialog and in the Note field, enter a description of your import to help you find it faster in the import monitoring logs and select Continue.
-
Upload the populated template.
-
Confirm the column headers by selecting the header row and then selecting Next.
-
Map the headers from your template to their corresponding fields in Professional and select Next.
-
Review your data to identify any typos, missing values, or incorrectly formatted data. You can edit your data directly in the dialog. Hover over any highlighted areas to view warning or error details.
-
Optional: To review any potential errors, turn on the Show only rows with errors toggle in the upper right. If errors exist, you can hover over each error to view advice on resolving it. After you resolve the errors, select Import Data.
-
Select Import Data to start the import.
|
After you submit the template, a message confirms you’ve submitted it successfully. The message doesn’t mean the data was successfully loaded in Professional. Check the Notifications area to view the status of your import. 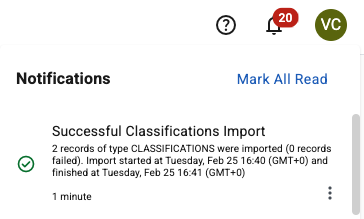
Figure 1. Example of the Notifications area message
|
Administrators can select and determine whether the import was processed successfully or find details about any errors. For more information, see Checking the status of an import process.
If the import process fails, make corrections to the template and try again.