Importing expenses
As a Beeline Professional administrator, you can import expenses into Beeline Professional using the Import Data tool.
When creating the expenses file for import, use the template provided by your Implementation Consultant. If you don’t have one, ask your Implementation Consultant to provide it. Alternatively, you can download a previously uploaded template.
If there are issues with the formatting of the file that you want to import, the system displays a warning and lists the errors that you must fix in order to resolve the issue. If you’re not sure how to format your data, contact your Customer Success Manager for assistance.
Steps
To import expenses, complete these steps from any supported browser.
-
Log in to Professional.
-
On your Home page, in the Quick Actions widget, click Import Data.
-
From the Data Type field, select Expense.
-
Depending on which template you are using, perform one of the following actions:
-
Locate the template provided by your Implementation Consultant.
-
Download the pre-uploaded template from the Import Templates list.
-
-
Open the provided or downloaded file in Microsoft Excel ©. The following columns are required:
-
Expense Id -
Supplier Reference Id -
Company Worker Id:Available in the Workers section. -
Engagement Id:Available in the Engagements section or in the engagements export file. -
Cost Center Reference Id -
Expense Category Reference Id:Available in Settings>Spend>Timesheet Settings>Expense Categories. -
Spent date -
Amount -
Currency -
Merchant -
Description -
Notes -
Worker Visible:Defaults to false. You can change it to true.
-
-
Populate the template by adding each expense as a separate row.
-
Save the completed template with a new file name.
-
In the Import Data dialog enter import file reference in the Note field to help identify the import later in monitoring logs. Click Continue.
-
Upload the populated template file.
-
Confirm column headers by selecting the header row. Click Next.
-
Map each column header to the corresponding fields in Professional. Click Next.
-
Review your data to identify any typos, missing values, or incorrectly formatted data. You can edit your data directly in the dialog. Hover over any highlighted areas to view warning or error details.
-
Optional: To review any potential errors, turn on the Show only rows with errors toggle in the upper-right corner. Hover over errors for tips on resolving them.
-
Select checkboxes to include all rows you want to import.
-
Select Import Data to start the import.
-
Optional: Depending on your tenant configuration, expenses may require approval or may be auto-approved. To check the expense status, go to Time & Expense from the Professional Home page.
|
After you submit the template, a message confirms you’ve submitted it successfully and that the import has begun. The message doesn’t mean the data was successfully loaded in Professional. Check the Notifications area to view the status of your import. 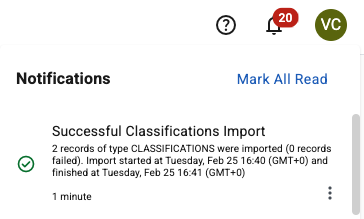
Figure 1. Example of the Notifications area message
|
Administrators can select and determine whether the import was processed successfully or find details about any errors. For more information, see Checking the status of an import process.
If the import process fails, make corrections to the template and try again.